Wish sheet views would sort correctly on sheet view panel.
8,9,10,11,12
Not
10,11,12,8,9


Wish sheet views would sort correctly on sheet view panel.
8,9,10,11,12
Not
10,11,12,8,9
UPDATE: New Corridor Transitions in Civil 3D 2023 and beyond have somewhat solved this problem.. Although with some bugs..
You can’t really transition in a way that is simple, like 12d, LDT, MX etc.
You can change the slope easily, but not transition easily! I.E Cubic, Linear transition etc.
A few methods you can use include the following.
Use the Superelevation editor??
Click on the subassembly that you want to transition (The Daylight) and select a super elevation mode say “Left Outside Lane”.
Then select your corridor and add a superelevation view
Then go through the cumbersome tabular editor to populatd the grades on the graph.Should look like so.

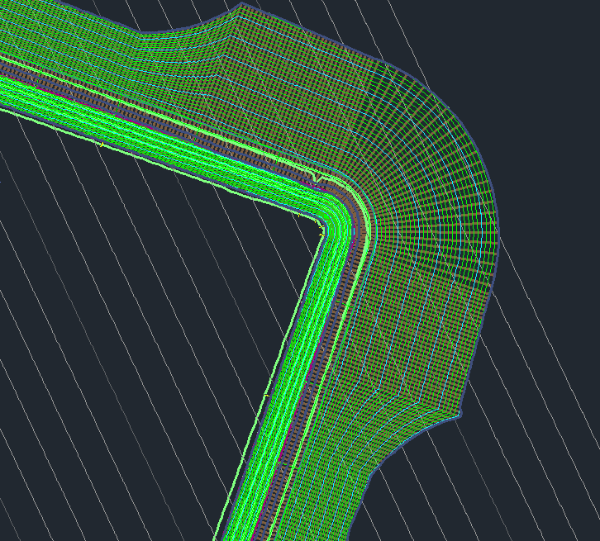
The finished results looks a little like so, which is somewhat alright, but still not nice, as the transition is linear. And we get jagged edges on the contours.
Use the Override Stations Method.
Select the corridor and go to the section editor

Select the Parameters Editor and modify the grade.

Then apply to the station range I want.

Still only gets me halfway there, as there is no transition options!!, the only way to force the transition from here is to change the sampling on the corridor reducing the quality of the transition anyway!

Do It manually by working out the location on the surface you need to widen to. But that is just not realistic!
Use a fixed link and link the grade in the fixed link to the daylight link. Also horribly cumbersome, but gets the best result.
Draw a Profile that represent grade so (elevation of 0.4 = 40% etc.)

Add a link with elevation target to your assembly like vertical elevation. Make sure it is added before your daylight link or this wont work

Next Select your Assembly go to its properties and select the construction tab, you need to link your daylights slope to your fake links elevation

Finally target the elevation profile with your new elevation link and watch the magic happen.

Looks the best, and it is dynamic, but extremely infuriating to setup.

Kapanther
UPDATE: *.12daz files are just zip files. Rename it to <YOURFILE>.zip and extract the *.12da file within
If anyone has been trying to use the 12DA import extension for Civil 3D and it isn’t working. Read on!
I have been having problems importing latest 12DA files. It doesn’t import anything for some reason.
A simple change to the 12DA files encoding fixes the error. Get NOTEPAD ++ Download Here
Old 12DA files encoded with “UTF-8 without BOM” will work. However new ones encoded with “UCS-2 Little Endian” won’t convert them and save as shown below. All working again!

Extra Bonus (courtesy lem_1020)
“Saved this way it actually allows you to open new version 12da projects in old 12d model versions also.”
Kapanther
Original Post Here
http://forums.autodesk.com/t5/AutoCAD-Civil-3D-General/Confirmed-Defect-Refill-Factor-Not-Working-Properly/td-p/5124890
This includes custom subassemblies.
Case ID: 09521000
Massive gripe for me. http://forums.autodesk.com/t5/AutoCAD-Civil-3D-Gen
Particularly for kerb returns!! the point code that is on top of the feature line ocassionally doesnt form a solid line it break into little segments.. Super annoying!
http://forums.autodesk.com/t5/AutoCAD-Civil-3D-General/C3D-2015-List-of-Current-Bugs-Issues/td-p/5012764
MAPIINSERT still not reading the GeoTIFF header UNITS at all, resulting in some images in US survey feet being brought in as meters.
http://forums.autodesk.com/t5/AutoCAD-Civil-3D-General/C3D-2015-List-of-Current-Bugs-Issues/td-p/5012764
If you use True Type text then you have probably seen this issue below


Sometimes a simple Z elevation fix will remove the dreaded fat text. Although ever so occasionally this will not suffice.
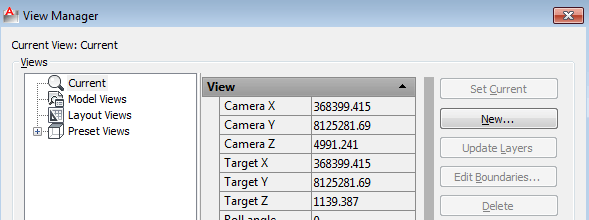
If you have fixed the z elevation and it still isn’t working it is usually due to the view center been out. To check, enter your viewport and type “VIEW”
If its wrong then it will probably look like so, (camera X and Camera Y display large values that should be 0)
To fix in the current drawing is quite simple
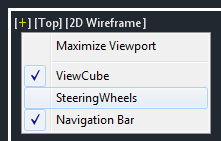
1. Select the little plus button in the top left corner of your viewport and select “Steering Wheels”
2. Right click and select “Restore Original Center”
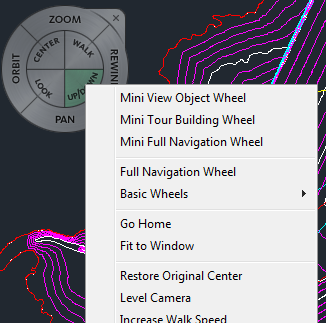
3. It will zoom out your viewport, but zoom in and look at that fine dainty text!
4. While your at it, type “VIEW” again whilst in the viewport
Camera X and Y are 0 and we only get Camera Z. Which is how high the eye altitude is
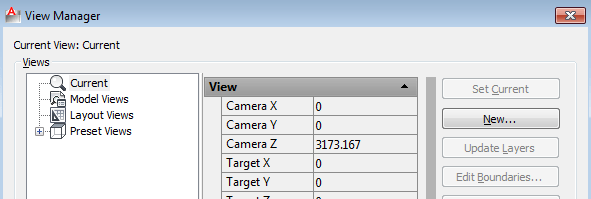
Saying all this we can avoid all this hassle by making a simple change to our templates!
When a viewport is created it will take the settings from the last viewport that was created in that drawing. So if we add a viewport to all our templates in layout space with the fix already applied as shown above. All the viewports we create from here on out won’t have this problem!
To check
1. Open your Blank Template and create a viewport and check camera X Y Z etc.
2.  AHHHHHH!!
3. Apply the fix to first viewport.
4. Create another viewport and check camera
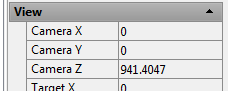 Viewport is perfect!!
UPDATE 2: My new tool completely obsoletes this process.. Stage storage basin tool is available in my free tools package here. But read on if you want to be a dinosaur..
https://ceethreedee.com/ceethreedee-tools
UPDATE: Feeling Lazy. Watch the Video.
This deals with basic “basin” stage storage calculations. For more complex stockpiles etc. Read this post here
Download lisp file from this link download COT
UPDATE: instead of using COT.lsp. Try the free “Table Exporter” App from the autodesk exchange from here. Only works in 2015 unfortunately 🙁
It will dump what ever table you select straight to excel though..

I see a lot of people still using this outdated tool in Civil 3D for calculating stage storage! For those who calculate stage storages read below!

Please stop using it! Although it is possible to get a relatively accurate result from it. There are a number of problems that I will merely bullet point below.
Civil 3D has always had the ability to do accurate stage storages, I will demonstrate below. (*with the assistance of a lisp!)
Download lisp file from this link download COT
1. Create a Volume Surface comparing Water Level or Final Tailings level etc. and your completed design. (Yes you can calculate tailings stages as well!)

2. Drop down elevations in the analysis tab at the intervals you wish to calculate your volumes at. (use Range Interval with Datum)
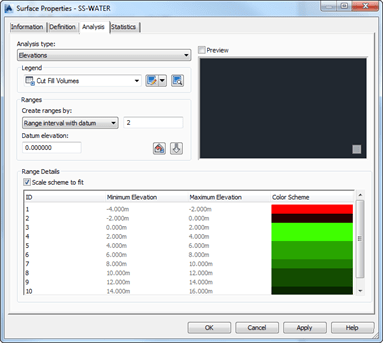
3. Create a surface legend table that includes “Surface Range volume” and Surface Range 2d area)


4. Copy table to left or right and explode twice, then use the attached lisp routine to convert to an autocad table.

5. Export Table to CSV as shown above and then open in excel. You will need to sum the areas and volumes from the bottom up to get the correct results.

Finished Result, sum up the volumes from the lowest elevation, (so the bottom up). or reverse the order and sum them from the top down..
| Elevation (m) | Plan Area (m²) | Cum. Area (m²) | Volume (m³) | Cum. Volume (m³) |
| 102 | 5,872 | 143,202 | 280,514 | 1,432,735 |
| 100 | 5,751 | 137,330 | 268,936 | 1,152,221 |
| 98 | 5,969 | 131,578 | 257,244 | 883,285 |
| 96 | 13,903 | 125,609 | 240,933 | 626,041 |
| 94 | 26,862 | 111,706 | 200,242 | 385,108 |
| 92 | 42,463 | 84,845 | 126,689 | 184,866 |
| 90 | 31,232 | 42,382 | 51,424 | 58,177 |
| 88 | 11,149 | 11,150 | 6,752 | 6,753 |
| 86 | 1 | 1 | 1 | 1 |
You will notice that unlike the old stage storage tool that can vary in accuracy especially with larger intervals. This method is exactly right down to the triangle.
Comment below if you want to know more


